So, there I was, in the office after doing Vinduro last year and spouting forth to anyone who would listen – or couldn’t escape – about how fabulous the event was. And that the twinshock enduro scene was sure to be a growth area, combining the speed of MX with the skill of trials but without the intensity of the former or the technicality of the latter.
As eyes started to glaze over, group editor Rose chucked “could you use an enduro for lots of things like riding to work and scrambling?” into the conversation.
“Ha! of course, almost the ideal type of bike for fun and a reasonable chance of success too,” I countered.
“Good,” he said, “there’s a small budget available to buy, do up, use, then give away, a bike… so what’s out there?”
Hooked, I now needed to know just how much of a budget was available before I could ‘see what was out there’.
When the figure of £1000 was mentioned things were looking good. Then, on the end of the sentence, was added “…to buy and do it up”. Still, these things are not impossible and a chance conversation with Chris Marsh – arch Can-Am enthusiast and the lad behind the Canned Ham website – mooted the idea that it was possible and he actually had a bike that could be prised from him.
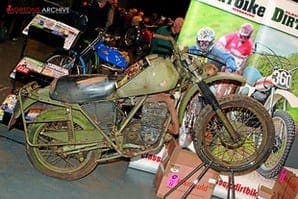
The deal was struck and the handover took place at the Classic Off-Road Show at Telford in February. When the bike was wheeled onto our stand at the show there were incredulous looks from CDB readers, surrounding stallholders and Andy Kitchen and Jane Farquharson as to the task ahead.
CDB columnist Jeff Smith, who was heavily involved in the Can-Am project and won several ISDT gold medals on similar machines to the one we’re doing, looked at me and said “you don’t look mad…” but then again, I didn’t fit the mental picture he had of ‘me’ before we met, so perhaps looks can be deceiving.
 The bike
Getting serious for a moment, the bike we’ve got is a 250cc Rotax engined Can-Am military model built for the British Army. Depending on your viewpoint it is either a 1974 model, 1978 model or 1980 model. The reasoning there is all the military machines were made in 1978 but issued in two batches – 1978 and 80 – but based on the 1974 enduro bike. It’s only confusing if you want it to be and we’re going to claim the bike as a 1974 machine. This allows us to enter it in a lot of events, get it seen and have a lot of fun before one of you gets your hands on it.
It’s fairly obvious that our Can-Am will need a lot of work before being able to travel under its own power but, though looking like a shed, the basis for the project isn’t that bad and the deal included enough bits to build an engine and enough spares to make it only minor things we’ll need to find.
This isn’t going to be a catalogue restoration that’s accurate to the nth degree but the resurrection of a motorcycle that will look good, perform well and provide inspiration to anyone with a similar budget.
The intention is to be totally honest in the rebuild and as the bike is to be given away, there will be some things that need to be done to make sure it’s right that – were it my own bike – I’d not need to do straight away. But the £1000 budget will be a target to aim for. If it’s exceeded then it will be shown where and explained why. There will be some help here, as some of the bits that will come off as the bike is stripped won’t go back on and are tradable items that will defray costs.
What are we aiming for?
I suppose it could be said that by not going catalogue then we’re taking shortcuts so, OK, yes we will be using off-the-shelf plastics, controls and bars rather than original stuff.
As with all projects it pays to have an ideal end result in mind and in this case it is a typical ISDT machine from the mid-1970s. That’s to be used as a guide rather than a template but will give something to work to.
I have to admit that I’m more of a ‘make sure the mechanicals are spot on’ type of person rather than going for a glitzy showcase machine that doesn’t work properly. There’ll be a certain amount of polished alloy, things like the fork yokes and sliders, wheel hubs and brake plates though, as the latter two items are magnesium they may have to be coated.
There will be a number of ISDT touches and as the project progresses I’ll be looking at making sure a minimum of tools are required to remove the wheels and do simple services. This is possibly because I’m a pedant… or possibly because I enjoy doing things like this and my BSA trials bike needs a spark plug sized box spanner, an 8mm Allen key, one small tyre lever and a 13mm spanner to do things like change a plug, remove either wheel and replace a tyre.
The finished bike will be road legal, eligible for Circa 74 scrambles – or the pre-77 class of their events – Vinduro ready and a lot of fun.
 I’ve got to admit to a raised eyebrow myself when I saw the bike on show at Chris Marsh’s stand at Telford and even he admitted he’d gone for shock tactics with it. The interest level, from those setting up their stalls in the International Centre on the Friday evening before the show, was high and this continued over the weekend with visitors to our stand. There were a number of offers of parts too, showing that there are Can-Am enthusiasts all over the place.
As with any restoration or rebuild it pays to make haste slowly as diving in ham-fistedly will ultimately cause problems and increase the expenditure. I spent a bit of time looking the bike over with both Chris Marsh and Jeff Smith, making a few notes and listing a few immediately obvious spares that would be needed.
After the show, and with the bike installed in the Britton workshop, the first task was to soak the thing in WD-40. Luckily I’d found a source of this in a five-litre can and just hosed the stuff on with a pump action spray, left it to soak and repeated each night for a week. This gave it time to soak in and left me time to meet my Old Bike Mart deadline.
Quietly, one evening, I approached the workshop to see how the easing oil had worked. There were boxes, trays and containers all over the place to hold the parts that would come off and to allow sub-assemblies to be soaked in oil.
I’d decided at the start all I would do that night would be to slacken off the fasteners and leave everything in place until the weekend when I could attack the bike from all sides. OK, so it never works like that and before I knew it, thanks to the WD-40, many of the Allen bolts were slackened. The front wheel was straight out and the forks dropped from the yokes.
It was obvious that the front wheel spindle was bent beyond use, that there were no brake shoes on the back plate and the wheel rims, fork seals and gators were beyond use. There was also a lot of corrosion on the alloy parts so these will have to be inspected to see if they are serviceable as I’m not used to dealing with magnesium castings.
 Next I will pull the yokes off and free the steering head bearings. Speaking of which, the bearings are of an eccentric design that allows tweaking of the head angle and wheelbase to suit your riding style. It’s likely the bearings are beyond viable repair so will have to be replaced and, no doubt, as the work progresses many more such things will come to light.
Though progress seems slow here, as we’re a quarterly publication there will be leaps and bounds and the next stage is to dismantle the hubs, pull out the engine and exhaust system and have the frame dipped in chemical cleaner. That will be one of the professional services we’ll have to take advantage of.
Hopefully, a viable machine will be on display in the Classic Dirt Bike Experience Hall during the Classic Motorcycle Show at Stafford County Showground over Easter weekend. ![]()
To view the remaining three parts in the Can-Am overhaul series – link below – and access to full workshop, reference and archive editorial, you must subscribe.


